Git and versioning explained
Free services
Integrate maps to your sites Editable QR Code after printing Customizable short link Password generator Create images for social networks Create harmonious color palettes Unminify your code Create .gitignore files with ease Restaurant reservation system Booking software for hairdressersLast time, I told you about CI/CD right here
I don't know if you thought it was cool, but today we're going to talk about Git itself.
"You've already explained to us, though, that it's meant to deploy our code online, is there anything else?"
Yes, CI/CD is only part of what Git can be used for. Indeed, its primary use is versioning. Behind this rather barbaric name lies something that is both very useful and almost magical. Yes, it is.
"What's this guy trying to sell us now?
Nothing, it's more a matter of saving you time - a lot of it, in fact.
Basic principle of versioning
Imagine you're coding a new feature, you've been at it for hours and it's only then that you realize that your site/application no longer works in another place!
"Gee Michel, what have we done?!"?
That's precisely the question. What happened and when did it start to bug? You can't always know, as you haven't tested this part at every stage of your code.
Don't worry, we won't hold this against you. On the other hand, if you haven't used Git, we're likely to hold it against you, and you'll be biting your own fingers in the process?
Thanks to Git, you can save your code at every stage and keep a clean version.
When you know your code is working, even when it's in production (at least I hope you do), with Git you can always come back to it, no matter what changes you make.
Git installation and main commands
To install Git, click here
Then, at the root of your project, simply create a Git repository with the command :
git init
Then, whenever you need to, just run two simple commands:
git add
Followed by the name of a file to be versioned, or a dot "." signifying that we're saving all our code
git commit -m
This will allow you to save this version, with a message indicating which step is involved.
Case in point
git add .
git commit -m "Add a condition testing that 1+1=2".
In this case, if our condition addition ever causes our code to crash for some obscure reason, all we have to do is go back to the previous commit to undo our changes.
We'll then see that the code does indeed bug on this modification.
And, above all, we'll be able to return to our clean version quickly, should the need arise.
Best practices for going further
When initializing a Git repository, a .gitignore file can be used to exclude certain files or folders from your commit. This prevents large dependencies (node_modules folder, for example?) from being sent to our repository.
It's always quicker and easier to redo an npm install / yarn install.
But that's not all: thanks to another magic command, we'll be able to see all the lines that have been modified between our current code version and our previous commit.
If you have a project with a few thousand lines of code, I can assure you that this is very practical.
This command is :
git diff
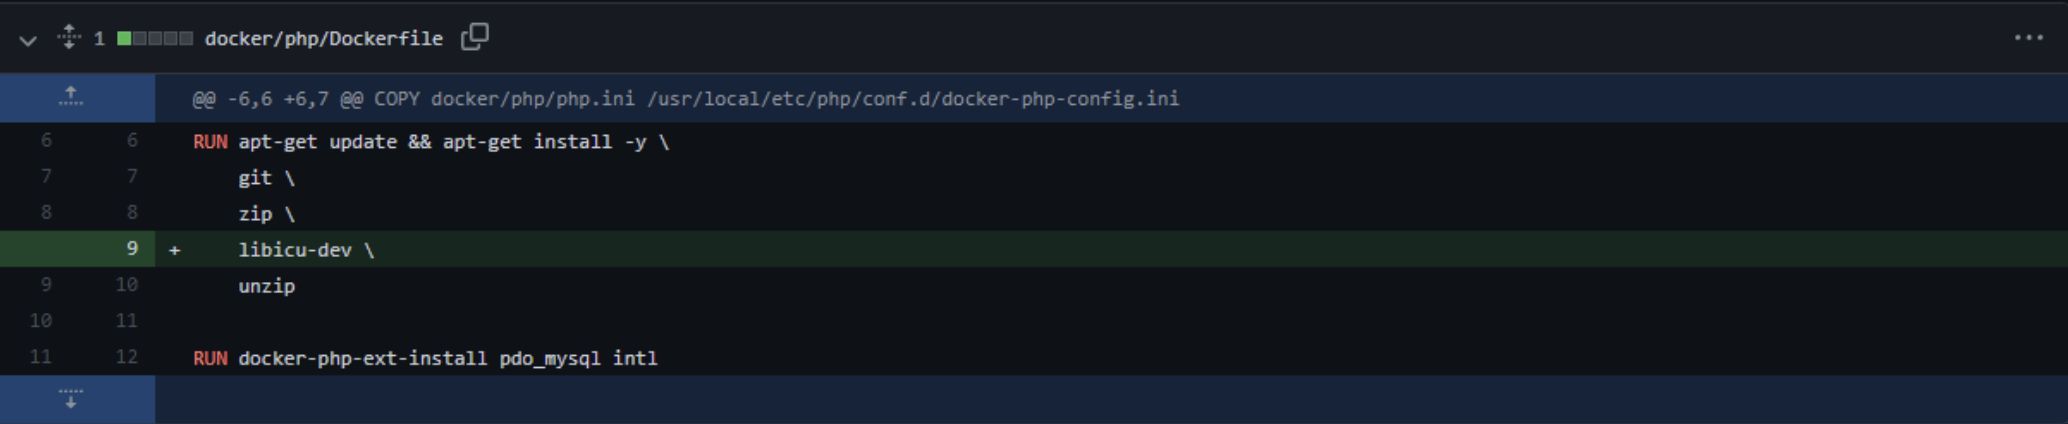
In this screenshot, the line in green corresponds to what has been added to our code since the previous version. In the event of deletion, a red line shows what has been removed.
With git, you can see at every stage (as long as you commit regularly) what has changed in your code and review any errors you may have made.
So now you know how to use Git in the most basic way, and you've got a new tool to make your life and your code management easier.
Next time, I'll explain how to use it when you're working with several people on the same project ?