Implementing OAuth2 in Symfony: a guide to securing your APIs
Free services
Integrate maps to your sites Editable QR Code after printing Customizable short link Password generator Create images for social networks Create harmonious color palettes Unminify your code Create .gitignore files with ease Restaurant reservation system Booking software for hairdressersHello everyone, thank you for clicking on this article! 😊
Today we're going to talk security and authentication.
What is OAuth2?
In life, and especially on the web, we generally authenticate ourselves with an email and a password. But this isn't always the case, especially when you need to connect to a third-party service or API.
If this is your case, you'll probably come across a type of protocol called OAuth2.
"What the hell is this?"
If you've ever had to create APIs you've probably handled JWTs or JSON Web Tokens, the principle of which is to create a token for each user who connects in order to authenticate each of their future API requests. 😛
With OAuth2, this principle isn't as different as it seems. Already, it also uses tokens, and you can also log in with a conventional login and password to get it.
Installation
To use OAuth2 in Symfony, we're going to use a dedicated bundle that you can install with :
Login with username/password
Once this bundle is installed, we'll be able to set up Symfony's default authentication system, the documentation for which can be found here.
Once this is done, we'll have database users who can log in using a standard login form.
Once you've got a user and his credentials, you can create a client for our OAuth2 authentication with this command :
You will then find this client in the database's oauth2_client table, and the console will reveal an identifier and a secret. Keep these two values, as we're going to use them again.
At this stage, you have a usable oauth2 client that works by "client_credentials", i.e. by identifier and password.
To use it, you need to create a POST request on the /oauth2/token route and pass a JSON of this type as content:
- grant_type specifying the type of authentication you wish to perform
- client_id and client_secret corresponding to the values created by the bundle above
- username and password corresponding to the user credentials you've already created
If all goes well, this request should return a valid Bearer token in this form:
Login with user consent
One of the most common ways of using OAuth2 is for the user himself to validate his connection to a third-party service.
For example, if you wish to connect to a site via your Facebook account, you click on the blue button, Facebook asks for your authorization and if you validate it, you are connected to the site in question. This is OAuth2. 🪄
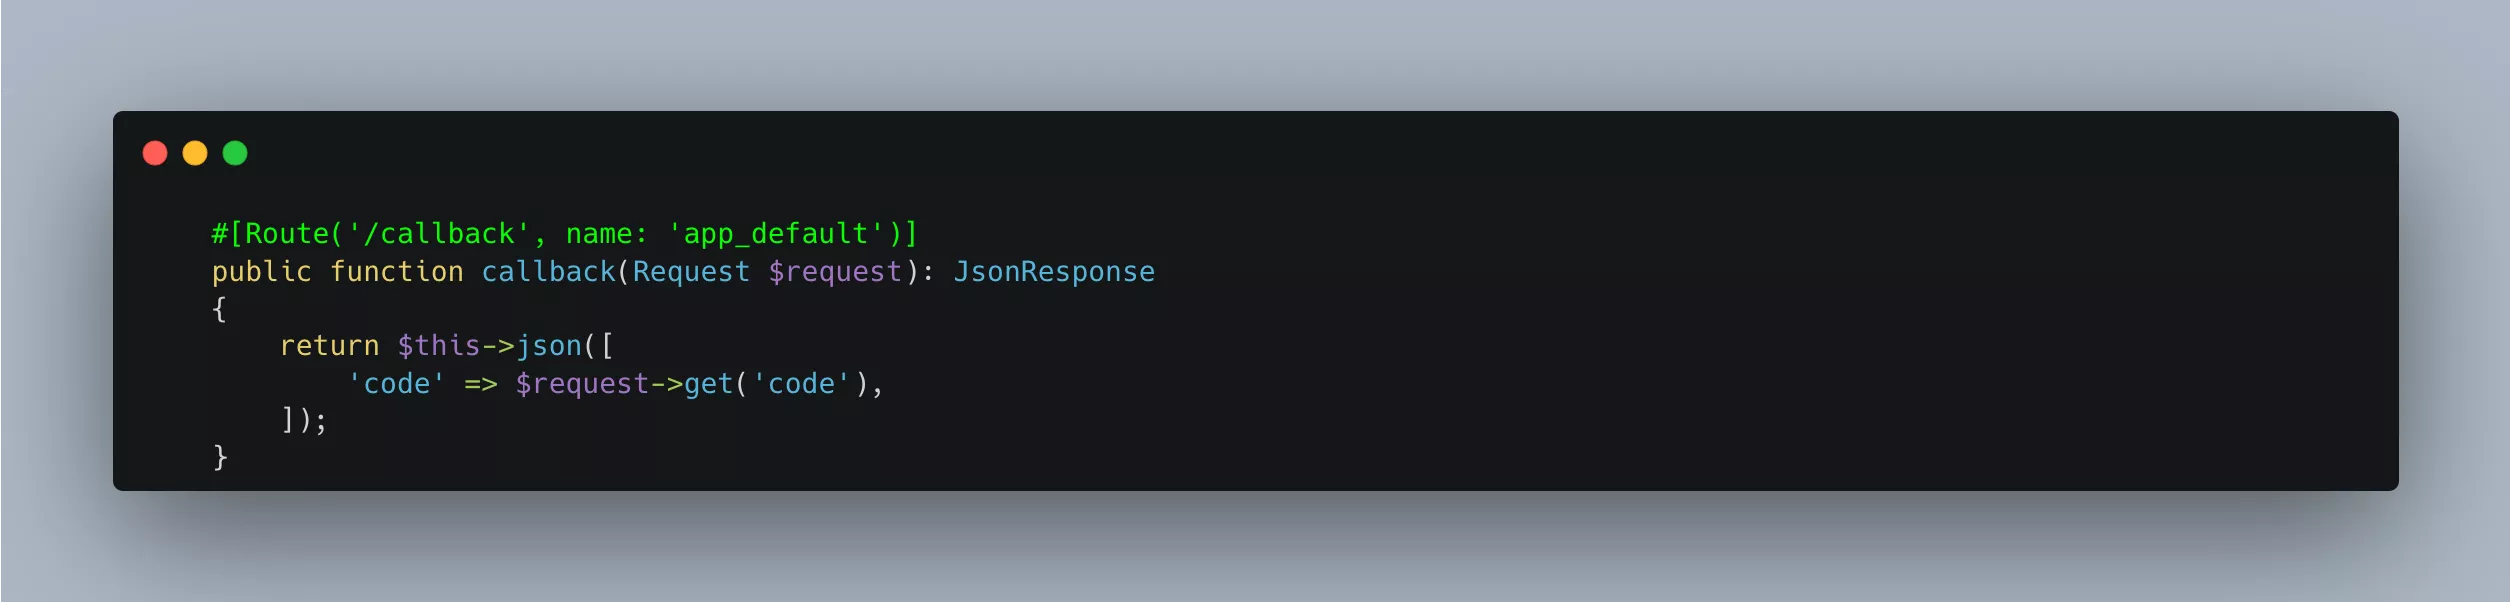
To implement this method, we're going to need one more element, which is a redirect URL. When your user agrees to log in, he'll be redirected to this URL to continue browsing.
You can therefore add a route of this type to a controller:
Now we're going to update the oauth2 client we created in the database in the first part of this article. To do this, there's a command directly in the bundle:
With this command, we've now defined that our authentication should work with an authorization code and a redirection URL.
To test this part, you can make a GET request this time, to the following route:
Let's break down the parameters of this route:
- response_type means that we want to retrieve a unique code following this request, so that we can send it in our POST request to /oauth2/token and obtain our token
- client_id always corresponds to the client registered in the database
- redirect_url is the redirection URL we've defined
- scope is set by default to email by the bundle
If you test this route directly, you should get an error specifying that it must be reached by a user already logged in.
This makes sense, as the user has to give us his consent, so we have to connect him first. 😛
Via the /login route, enter the login details of the registered user and log in.
Now we're one step away from having a page with a button to authorize the connection or not.
So let's add this route to a controller:
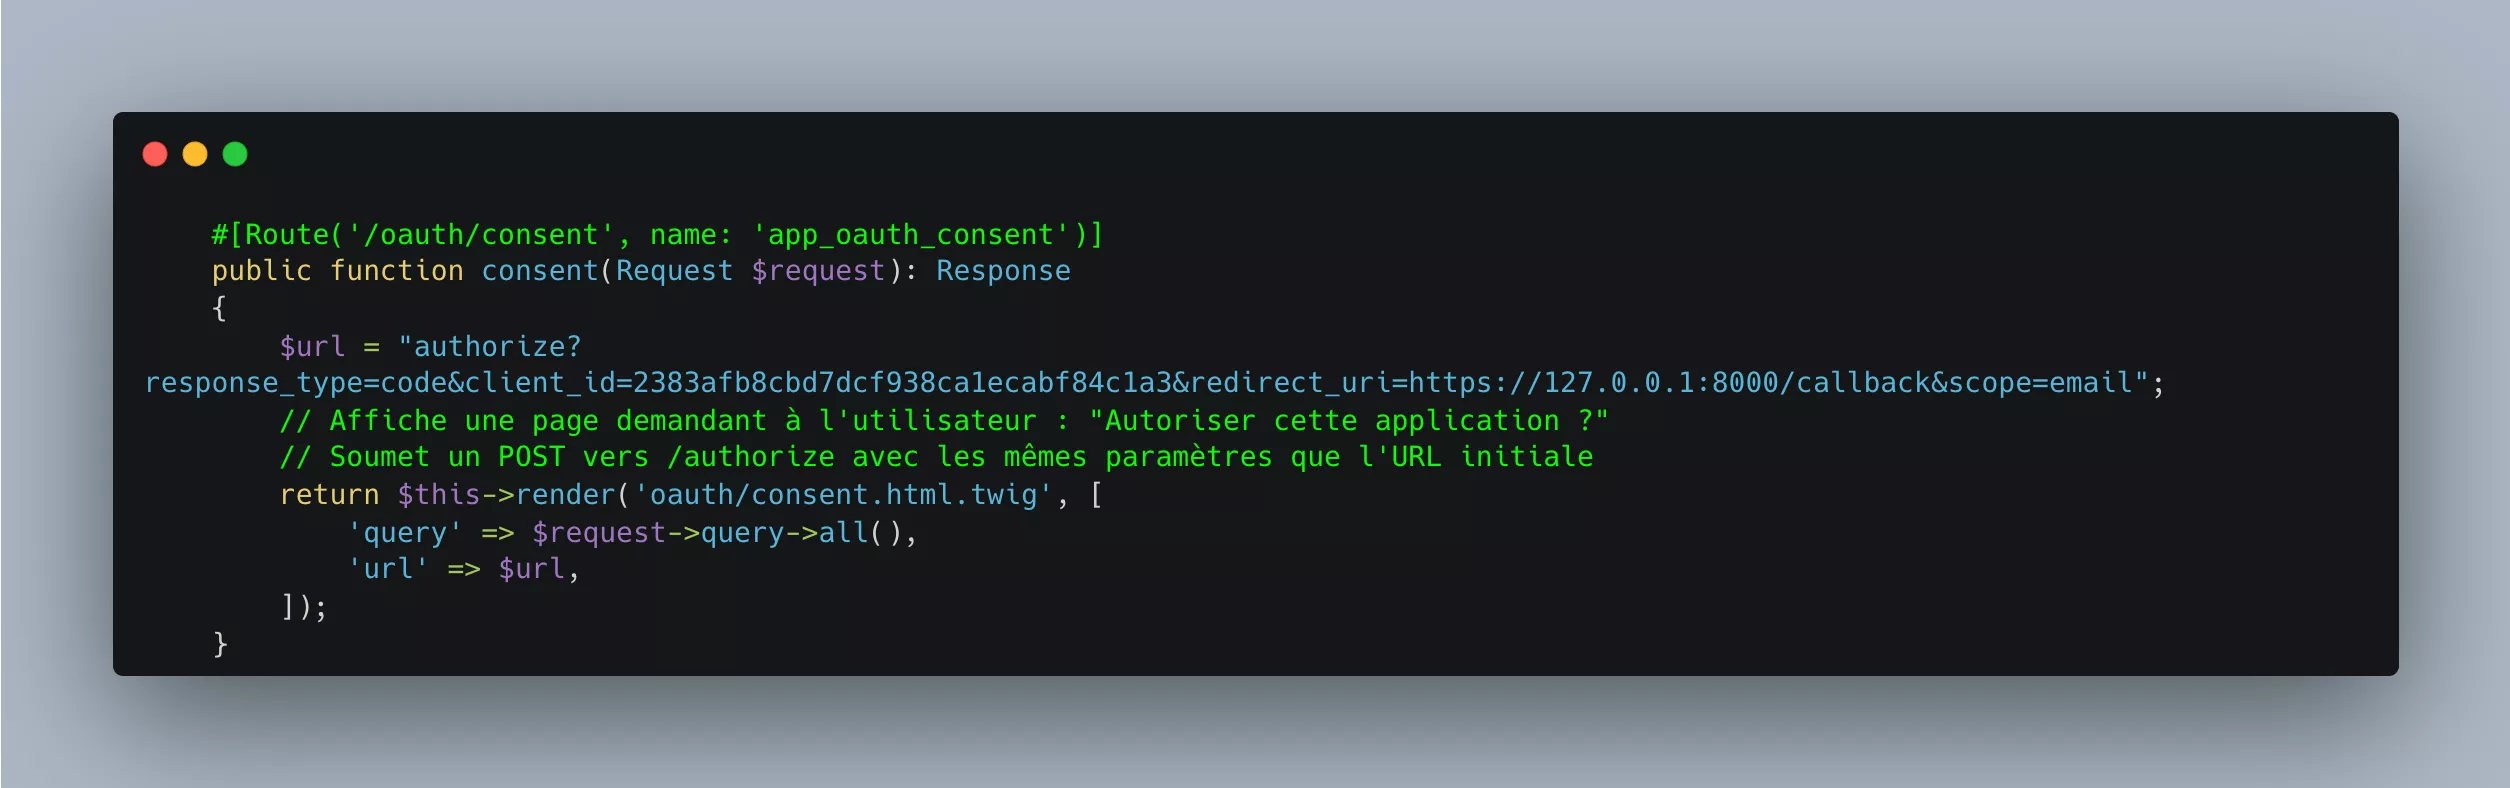
Here we write our url with its parameters, to which the user will be sent if he authorizes the connection.
In a twig, we display a basic form:
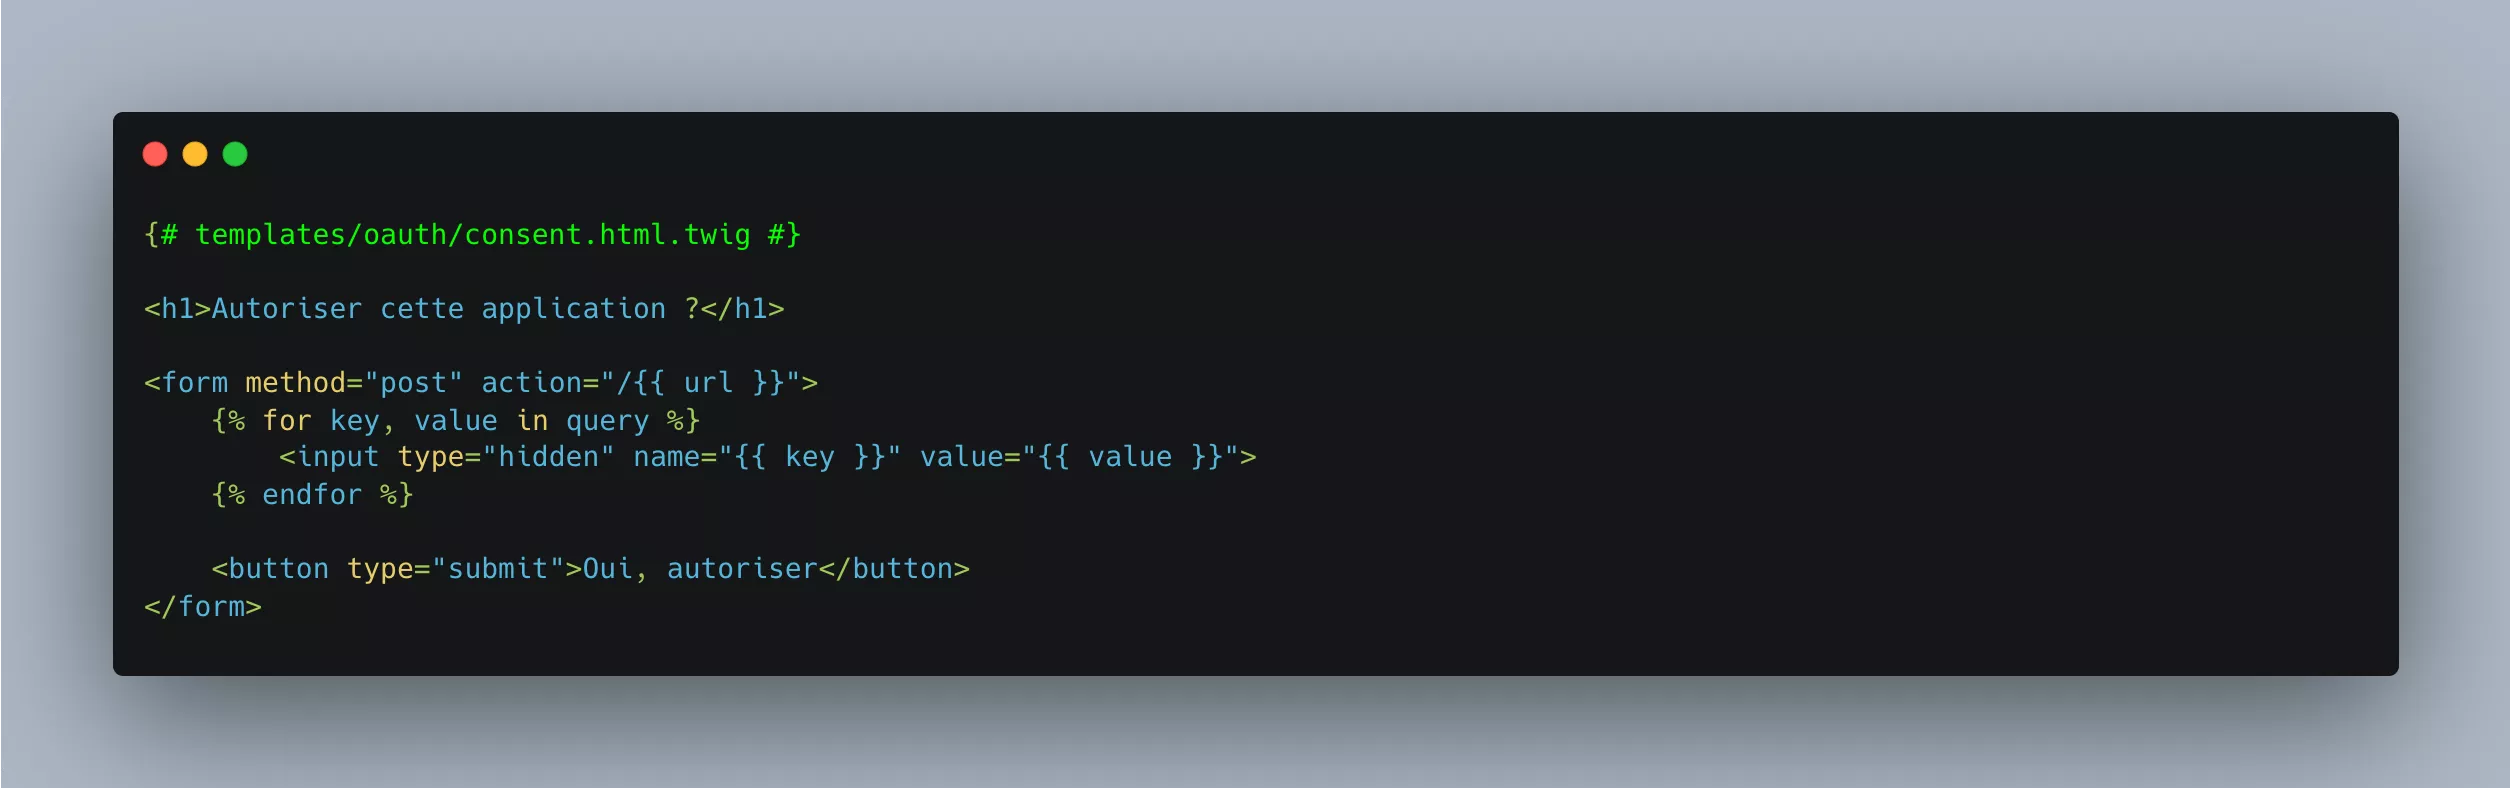
The user will then be able to give his consent directly via the web page.
"Great, everything's ready! Let's test it!
Everything? No, not quite. There's still one step to write, which will enable us to either validate the user's consent or redirect him to the consent page.
To do this, we'll create an EventSubscriber to listen for the AUTHORIZATION_REQUEST_RESOLVE event.

If the request is POST, the form has been submitted and validated, so we can authenticate our user. If not, we'll redirect him to our newly created route. 😊
When you validate the form, you're now redirected to a URL of the type
This parameter code can now be used in the POST request to oauth2/token with the following content:
As before with user/password login, you obtain a usable token. 😄
Conclusion
So now you know how to implement an OAuth2-based authentication system, and you can also see what happens "on the other side" when you authorize your Facebook, Google, etc. account to connect to a third-party site or application.
See you soon for more exciting techniques 😊